话说最近真是干啥啥不行。
先说背景
手机被收了,只能用树莓派听歌,不过我的派并没有配屏幕……所以最初的方法是:打开电脑->连上VNC->打开树莓派的浏览器访问网易云,虽然能听,但是切歌、调音量都得通过电脑调,很麻烦,而且开着Chromium树莓派发热恐怖。
手头上正好有红外接收头+遥控器,于是乎萌生了用遥控器控制树莓派的方法。先网上搜了一下有没有现成的轮子,结果“哇,LIRC一步到位”“哇,XBMC专业播放器”,然后我被各种坑,被网上的那些半残教程坑、被软件坑、被遥控器坑……经过一番艰苦奋斗,终于调好了,然而当我把调好的设备转移到书房的时候,红外接收头烧了……烧了,散发出一种刻骨铭心的糊味,熏出了我淡淡的忧伤。
悲愤的我重新刷回了raspbian,打开文本编辑器,自己来。
要不说我干啥啥不行呢,熬夜捣鼓出了100来行Python,还是在有pygame这个轮轴的前提下,实现了暂停和继续播放、音量调整,使用GPIO+微动开关控制。第二天上午加上了切歌功能。
OK,正文开始。
首先是接线,线一大坨,不过很简单,就是接五个按键。如图(不含LCD):
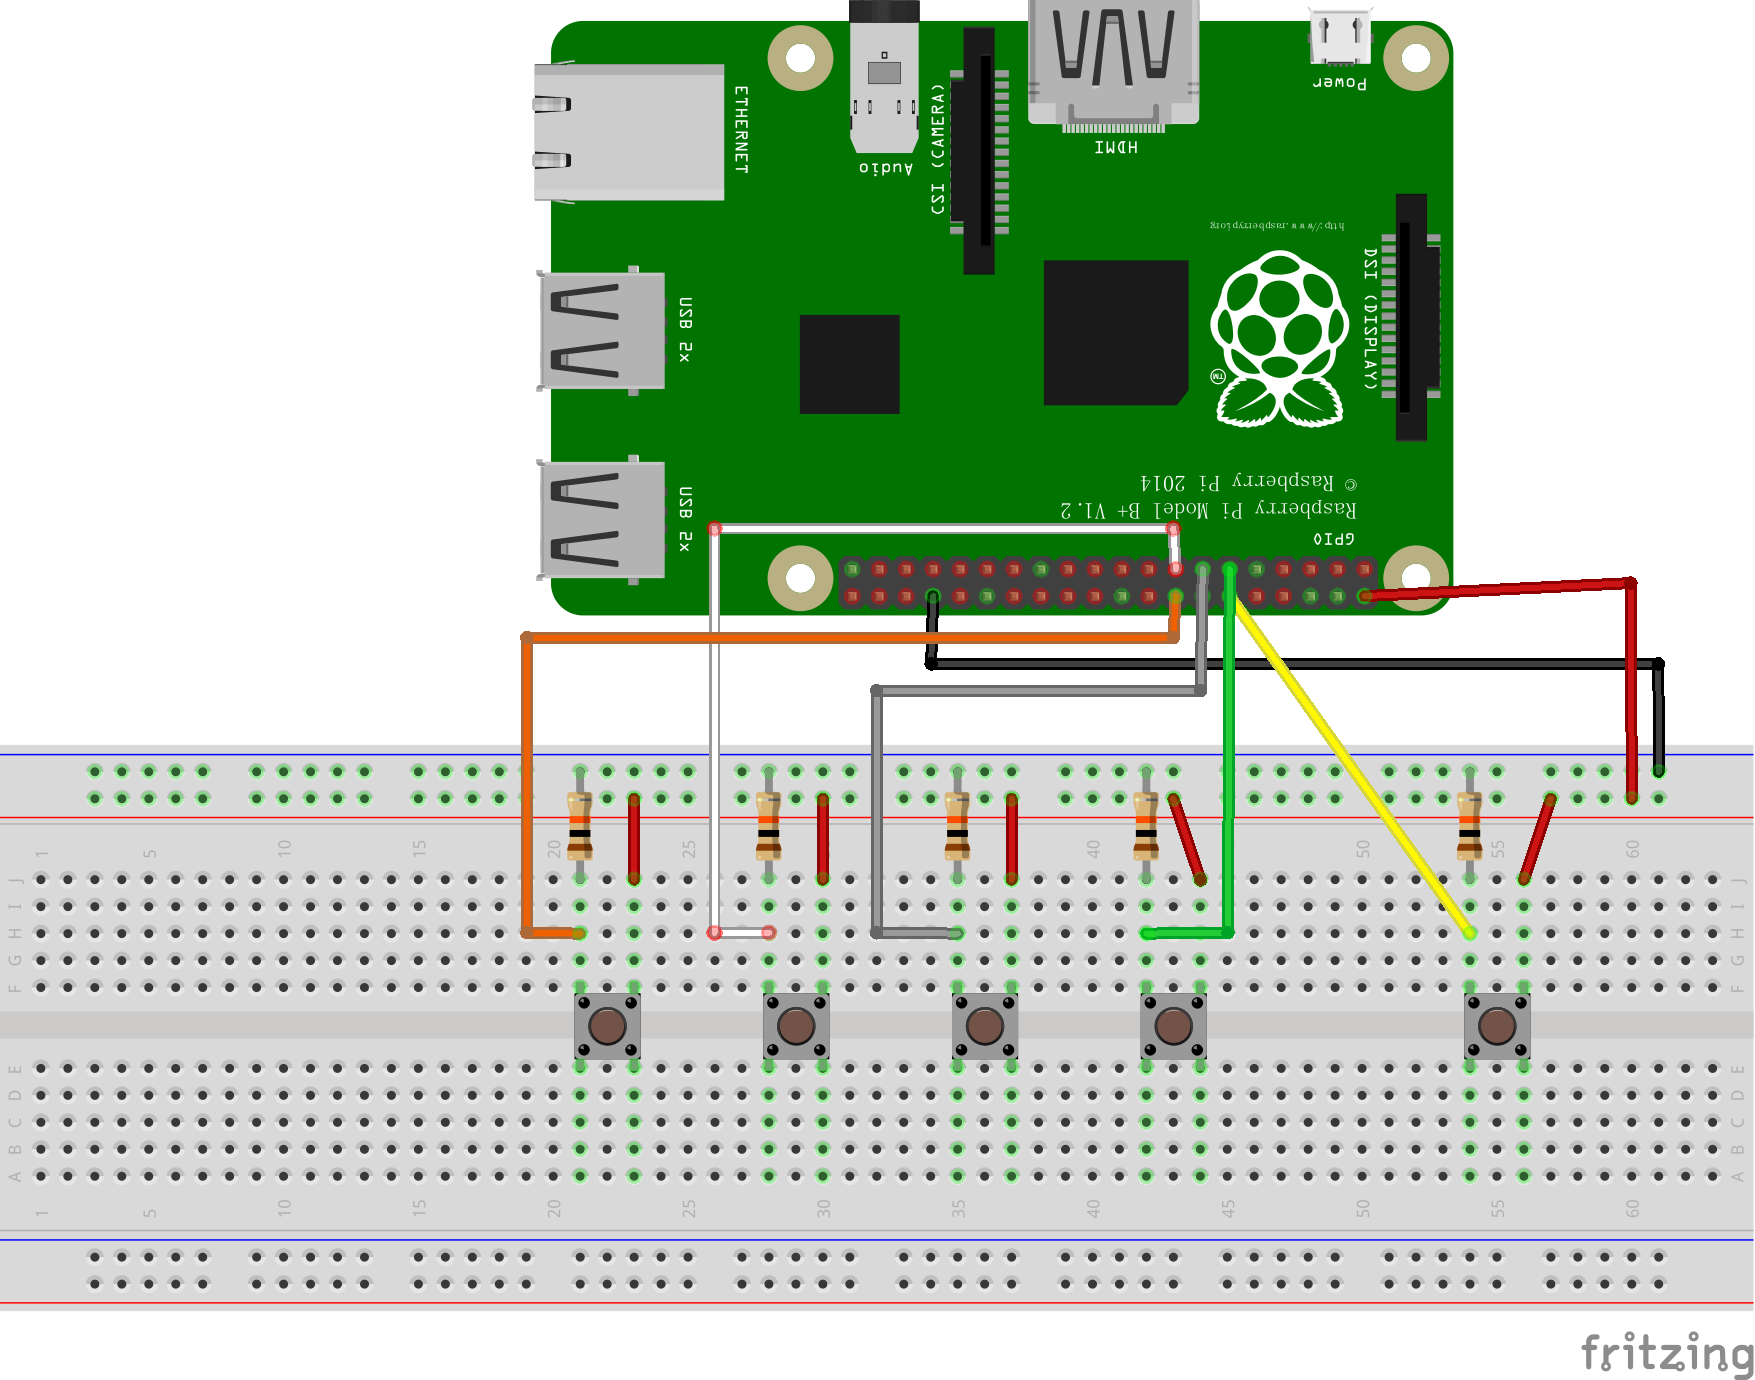
(本来自己摸索着连了一大坨很有成就感,画出来一看真TM简单)
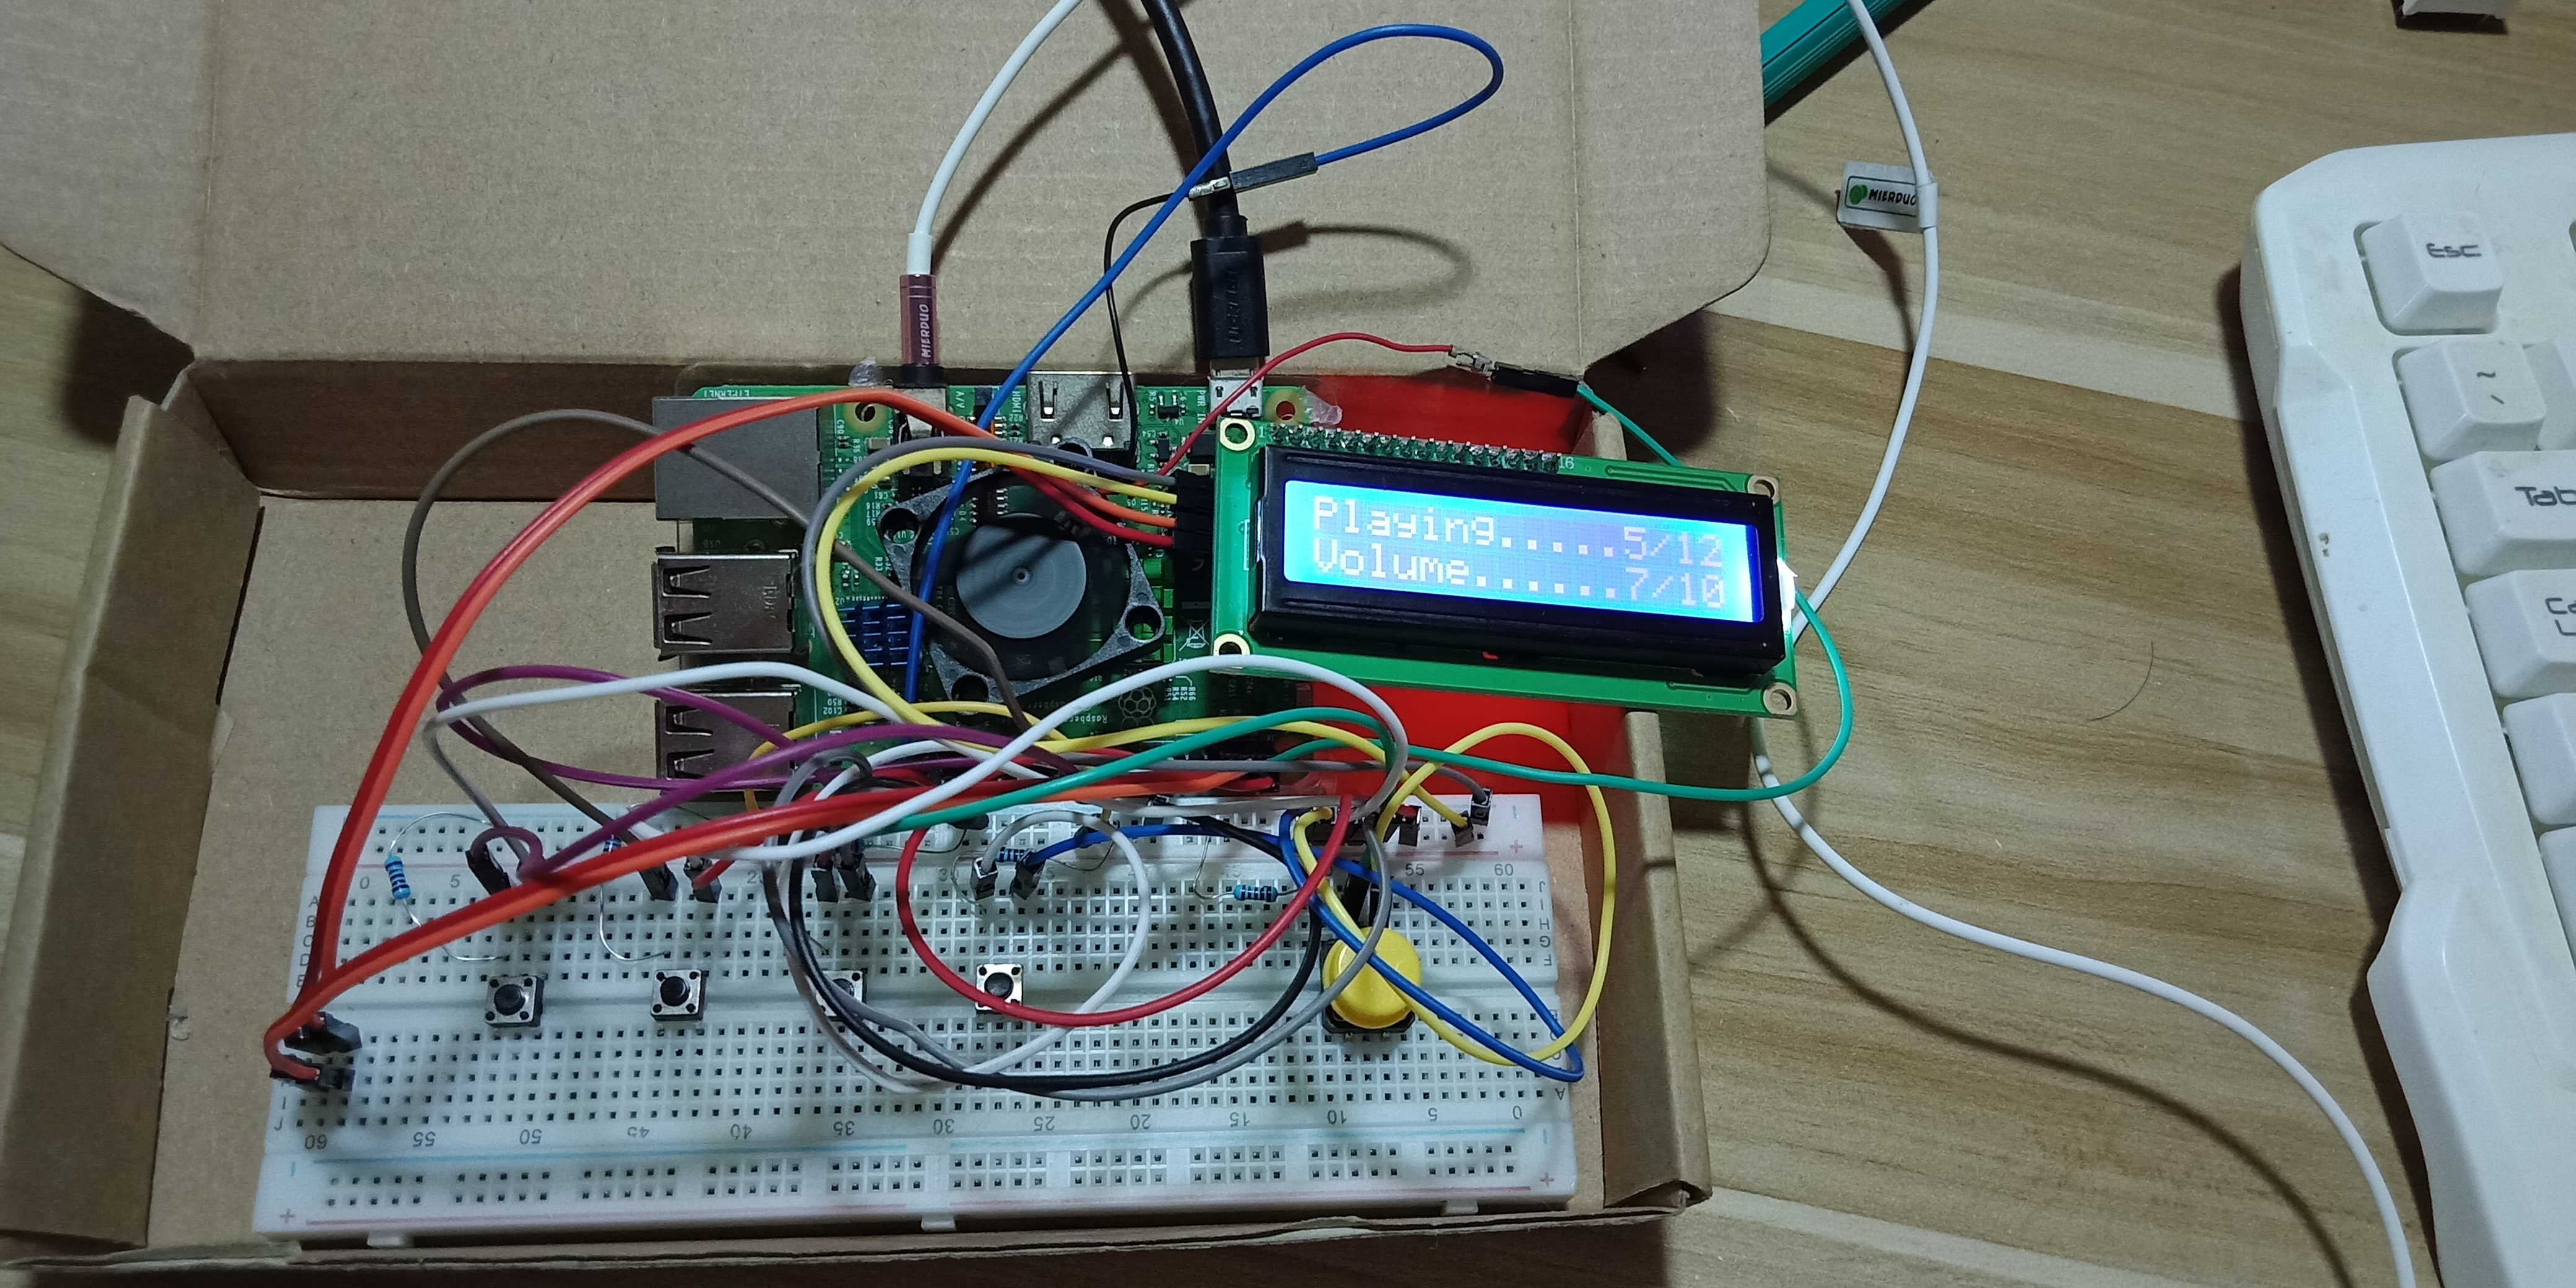
以下是成品图,最终我添加了一块LCD1602,用来显示歌曲序号和音量:
然后是代码,用pygame库来实现音乐的播放和控制,多线程同时监听5个按键和控制LCD,整体逻辑很简单,说实在的还是有许多不好把控的细节的,比如……额……控制上下曲的时候防止数组溢出、确保LCD的文字正好占满全屏,以及一些反应播放状态变量方便增加新功能。
P.S.:关于监测GPIO口状态的方法,我用的是GPIO.event.detected(),这个会在后台持续监听,其实我已经用while轮询了,就没必要用这个,一般的GPIO.input()就可以了,懒得改了。
添加音乐需要先执行scan.py生成目录。
main.py:
- #coding=utf-8
- import RPi.GPIO as GPIO,time,pygame,threading,os,json
- #import LCD1602 Module
- from lcd_i2c import *
- lcd_string("Loading...",LCD_LINE_1)
- #GPIO setup
- #part1
- GPIO.setmode(GPIO.BCM)
- #Pin2use [volumeup,volumedown,play/pause,next,previous]
- pinList= [17,27,18,22,23]
- pinVolume = pinList[0:2]
- GPIO.setup(pinList,GPIO.IN)
- for pinSingle in pinList:
- GPIO.add_event_detect(pinSingle, GPIO.RISING)
- pinPlay = pinList[2]
- pinNext = pinList[3]
- pinPrev = pinList[4]
- #Default volume value(0.0~1.0)
- volume = 0.50000000
- statelist = [0,0]
- #Music Playing
- with open('index.list','r') as index:
- filelist = json.loads(index.read())
- print(filelist)
- #filelist =['菅原纱由理(THE\xa0SxPLAY) - Guardian.mp3', '不才 - 一身诗意千寻瀑.mp3', 'Riin - Alice good night.mp3', '林和夜 - 相聚万年树.mp3', '苏尚卿 - 雪年轮(颜如玉ver).mp3', '菅原纱由理(THE\xa0SxPLAY) - キミが残した世界で.mp3', '匀子 - 铃舟.mp3', '花粥 - 一腔诗意喂了狗.mp3', 'Minnutes - I Can.mp3', '绯村柯北,灰老板 - 东流.mp3', 'Cranky - La Promesse.mp3', '关晓彤 - 音梦.mp3', '刘惜君 - 我很快乐.mp3', '张恋歌 - 不忘 (完整版).mp3', '呦猫UNEKO - 梦回还.mp3', '冥月,Mario - 若当来世.mp3', '林和夜 - 此彼绘卷.mp3']
- lens = len(filelist)
- filePlaying = 0
- pygame.mixer.init()
- track = pygame.mixer.music.load(filelist[filePlaying])
- pygame.mixer.music.set_volume(volume)
- pygame.mixer.music.play()
- pause=0
- #main function
- def playpause():
- global pause
- while True:
- while GPIO.event_detected(pinPlay):
- while GPIO.event_detected(pinPlay) == 0:
- if pause == 0:
- print('pause music')
- pygame.mixer.music.pause()
- pause=1
- else:
- print('resume music')
- pygame.mixer.music.unpause()
- pause=0
- break
- time.sleep(1)
- time.sleep(1)
- def volume():
- #volume
- global volume
- volume = 0.5
- while True:
- i=0
- for pinSingle in pinVolume:
- statelist[i] = GPIO.event_detected(pinSingle)
- i=i+1
- # print('Volume keys state',statelist)
- if statelist[0]==True:
- print('volume up')
- volume = volume + 0.1
- if volume > 1.0:
- volume = 1.0
- print('volume value:',volume)
- if statelist[1]==True:
- print('volume down')
- volume = volume - 0.1
- if volume < 0.0:
- volume = 0.0
- print('volume value:',str(round(volume*10)))
- pygame.mixer.music.set_volume(volume)
- time.sleep(0.5)
- #自动切歌 手动切歌
- def switch():
- global filePlaying,track,pause
- while True:
- filePlayingchk = filePlaying
- if pygame.mixer.music.get_busy() == 0 :
- filePlaying = filePlaying + 1
- else:
- if GPIO.event_detected(pinNext) == 1 :
- while GPIO.event_detected(pinNext) == 0:
- filePlaying = filePlaying + 1
- break
- if GPIO.event_detected(pinPrev) == 1 :
- while GPIO.event_detected(pinPrev) == 0:
- filePlaying = filePlaying - 1
- break
- if filePlaying < 0:
- filePlaying = lens -1
- elif filePlaying > lens -1:
- filePlaying = 0
- if filePlayingchk != filePlaying :
- track = pygame.mixer.music.load(filelist[filePlaying])
- pygame.mixer.music.play()
- pause = 0
- print(filePlaying + 1,filelist[filePlaying])
- time.sleep(0.5)
- #LCD1602 Module
- def displayContent():
- # Main program block
- global filePlaying,pause,volume,lens
- # Initialise display
- lcd_init()
- while True:
- # Send some test
- figure = len(str(lens)) + len(str(filePlaying + 1))
- if pause == 0:
- playState = "Playing"
- dots = 8 - figure
- while dots > 0:
- playState = playState + "."
- dots = dots -1
- else:
- playState = "Paused"
- dots = 10 - figure
- while dots > 1:
- playState = playState + "."
- dots = dots -1
- if int(round(volume,1)*10) == 10:
- dots2 = "....."
- else:
- dots2 = "......"
- lcd_string(playState + str(filePlaying + 1) + "/" + str(lens) ,LCD_LINE_1)
- lcd_string("Volume" + dots2 + str(round(volume*10)) + "/" + "10",LCD_LINE_2)
- time.sleep(1)
- def displayModule():
- while True:
- if __name__ == '__main__':
- try:
- displayContent()
- except KeyboardInterrupt:
- pass
- finally:
- lcd_byte(0x01, LCD_CMD)
- #Muti-threads
- threads=[]
- t1 = threading.Thread(target=playpause)
- threads.append(t1)
- t2 = threading.Thread(target=volume)
- threads.append(t2)
- t3 = threading.Thread(target=switch)
- threads.append(t3)
- t4 = threading.Thread(target=displayModule)
- threads.append(t4)
- print('Wait......')
- print(filePlaying + 1,filelist[filePlaying])
- if __name__ == '__main__':
- for t in threads:
- t.setDaemon(True)
- t.start()
- t.join()
scan.py:
- #coding=utf-8
- import os,json
- #指定扫描目录,生成index.list
- path = '/home/pi/Music/'
- dirs = os.listdir(path)
- support = ['.mp3','.ogg']
- filelist = []
- for file in dirs:
- filename = os.path.splitext(file)
- if filename[-1] in support:
- filelist.append(path + file)
- print(file)
- with open('index.list', 'w') as index:
- index.write(json.dumps(filelist))
这两个文件还可以再整合,另外这样还是需要在SSH上手动运行的,可以添加一个开机启动服务。
LCD1602的操作库,会在main.py里导入:
- #!/usr/bin/python
- #coding=utf-8
- #--------------------------------------
- # ___ ___ _ ____
- # / _ \/ _ \(_) __/__ __ __
- # / , _/ ___/ /\ \/ _ \/ // /
- # /_/|_/_/ /_/___/ .__/\_, /
- # /_/ /___/
- #
- # lcd_i2c.py
- # LCD test script using I2C backpack.
- # Supports 16x2 and 20x4 screens.
- #
- # Author : Matt Hawkins
- # Date : 20/09/2015
- #
- # http://www.raspberrypi-spy.co.uk/
- #
- # Copyright 2015 Matt Hawkins
- #
- # This program is free software: you can redistribute it and/or modify
- # it under the terms of the GNU General Public License as published by
- # the Free Software Foundation, either version 3 of the License, or
- # (at your option) any later version.
- #
- # This program is distributed in the hope that it will be useful,
- # but WITHOUT ANY WARRANTY; without even the implied warranty of
- # MERCHANTABILITY or FITNESS FOR A PARTICULAR PURPOSE. See the
- # GNU General Public License for more details.
- #
- # You should have received a copy of the GNU General Public License
- # along with this program. If not, see <http://www.gnu.org/licenses/>.
- #
- #--------------------------------------
- import smbus
- import time
- # Define some device parameters
- I2C_ADDR = 0x3f # I2C device address
- LCD_WIDTH = 16 # Maximum characters per line
- # Define some device constants
- LCD_CHR = 1 # Mode - Sending data
- LCD_CMD = 0 # Mode - Sending command
- LCD_LINE_1 = 0x80 # LCD RAM address for the 1st line
- LCD_LINE_2 = 0xC0 # LCD RAM address for the 2nd line
- LCD_LINE_3 = 0x94 # LCD RAM address for the 3rd line
- LCD_LINE_4 = 0xD4 # LCD RAM address for the 4th line
- LCD_BACKLIGHT = 0x08 # On
- #LCD_BACKLIGHT = 0x00 # Off
- ENABLE = 0b00000100 # Enable bit
- # Timing constants
- E_PULSE = 0.0005
- E_DELAY = 0.0005
- #Open I2C interface
- #bus = smbus.SMBus(0) # Rev 1 Pi uses 0
- bus = smbus.SMBus(1) # Rev 2 Pi uses 1
- def lcd_init():
- # Initialise display
- lcd_byte(0x33,LCD_CMD) # 110011 Initialise
- lcd_byte(0x32,LCD_CMD) # 110010 Initialise
- lcd_byte(0x06,LCD_CMD) # 000110 Cursor move direction
- lcd_byte(0x0C,LCD_CMD) # 001100 Display On,Cursor Off, Blink Off
- lcd_byte(0x28,LCD_CMD) # 101000 Data length, number of lines, font size
- lcd_byte(0x01,LCD_CMD) # 000001 Clear display
- time.sleep(E_DELAY)
- def lcd_byte(bits, mode):
- # Send byte to data pins
- # bits = the data
- # mode = 1 for data
- # 0 for command
- bits_high = mode | (bits & 0xF0) | LCD_BACKLIGHT
- bits_low = mode | ((bits<<4) & 0xF0) | LCD_BACKLIGHT
- # High bits
- bus.write_byte(I2C_ADDR, bits_high)
- lcd_toggle_enable(bits_high)
- # Low bits
- bus.write_byte(I2C_ADDR, bits_low)
- lcd_toggle_enable(bits_low)
- def lcd_toggle_enable(bits):
- # Toggle enable
- time.sleep(E_DELAY)
- bus.write_byte(I2C_ADDR, (bits | ENABLE))
- time.sleep(E_PULSE)
- bus.write_byte(I2C_ADDR,(bits & ~ENABLE))
- time.sleep(E_DELAY)
- def lcd_string(message,line):
- # Send string to display
- message = message.ljust(LCD_WIDTH," ")
- lcd_byte(line, LCD_CMD)
- for i in range(LCD_WIDTH):
- lcd_byte(ord(message[i]),LCD_CHR)
- def main():
- # Main program block
- # Initialise display
- lcd_init()
- while True:
- # Send some test
- lcd_string("RP嗨L <",LCD_LINE_1)
- lcd_string("I2C LCD <",LCD_LINE_2)
- time.sleep(3)
- # Send some more text
- lcd_string("> RPiSpy",LCD_LINE_1)
- lcd_string("> I2C LCD",LCD_LINE_2)
- time.sleep(3)
- if __name__ == '__main__':
- try:
- main()
- except KeyboardInterrupt:
- pass
- finally:
- lcd_byte(0x01, LCD_CMD)
Python2.7和3都可以用,推荐使用3,可以在SSH里显示中文歌名。

哇我捣鼓了好久的东西这一会儿就说完了,不得劲啊。毕竟这些东西在树莓派上用Python实现比较省力,不涉及底层。如果做到单片机上就比较牛逼了(不使用现成的模块),不多说了,最近在研究电子电路。
