今天打算做一个完全部署ownCloud/Nextcloud的教程,将之前零散的教程集中起来。
VPS及外部环境
我这儿演示所用的VPS是Bandwagon的SPECIAL 20G PROMO V3 - LOS ANGELES - CHINA DIRECT ROUTE,机房直连大陆,下载和上传速度都比较可观。
系统使用Ubuntu 16.04,像Debian一类的系统也完全可以跟着本教程做,CentOS之类的就会有所不同了。
DNS解析
为了之后的SSL等配置,强烈建议解析一个域名到VPS上。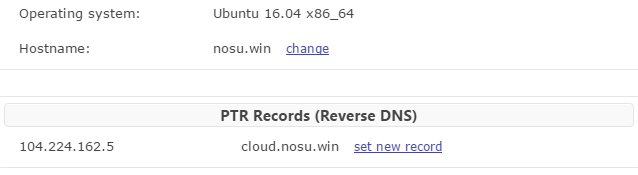
环境配置
使用SSH登陆VPS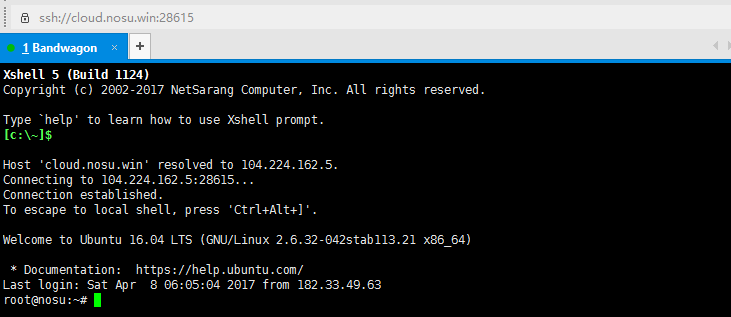
更新软件源:
root@nosu:apt-get update
安装Apache:
root@nosu:apt-get install apache2 -y #安装apache

root@nosu:service apache2 start      #启动apache
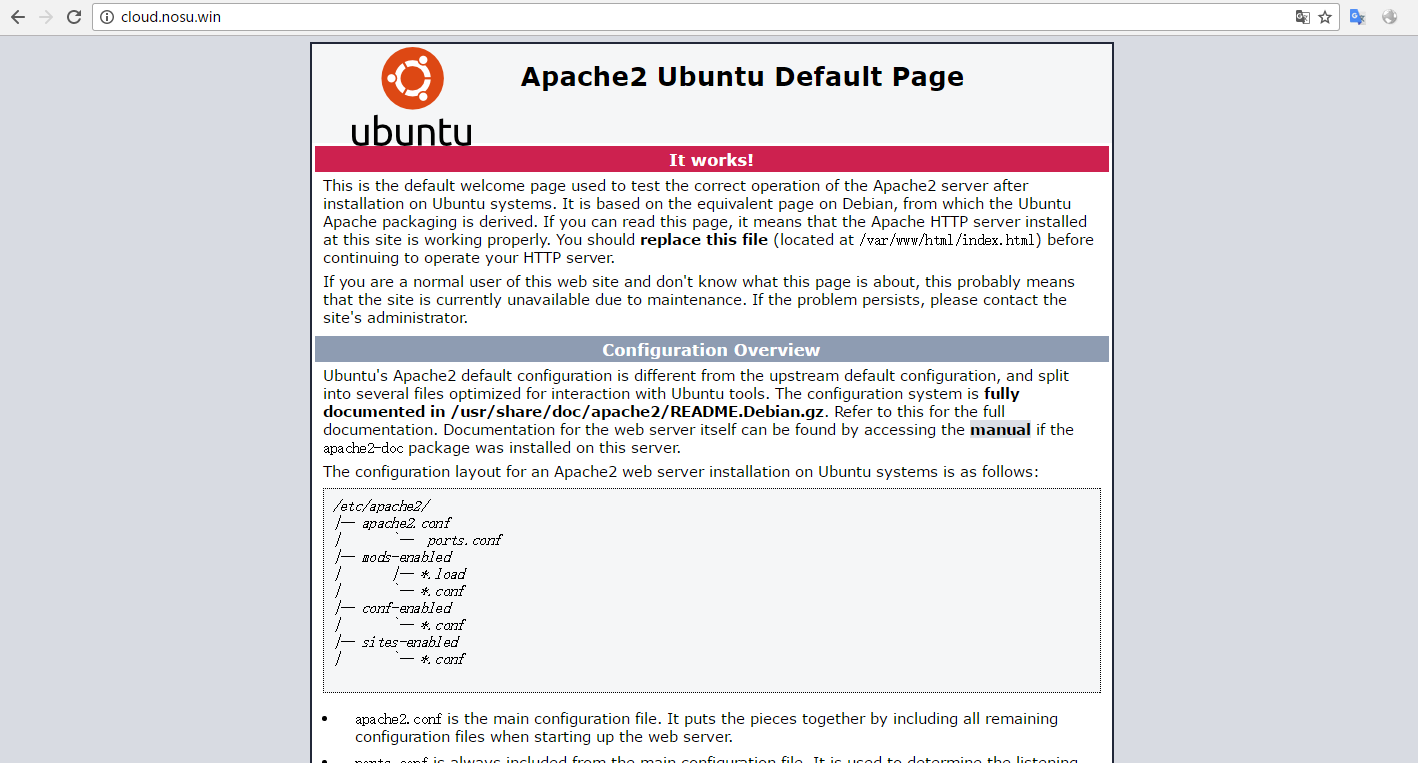
看到以上网页说明Apache运行正常。
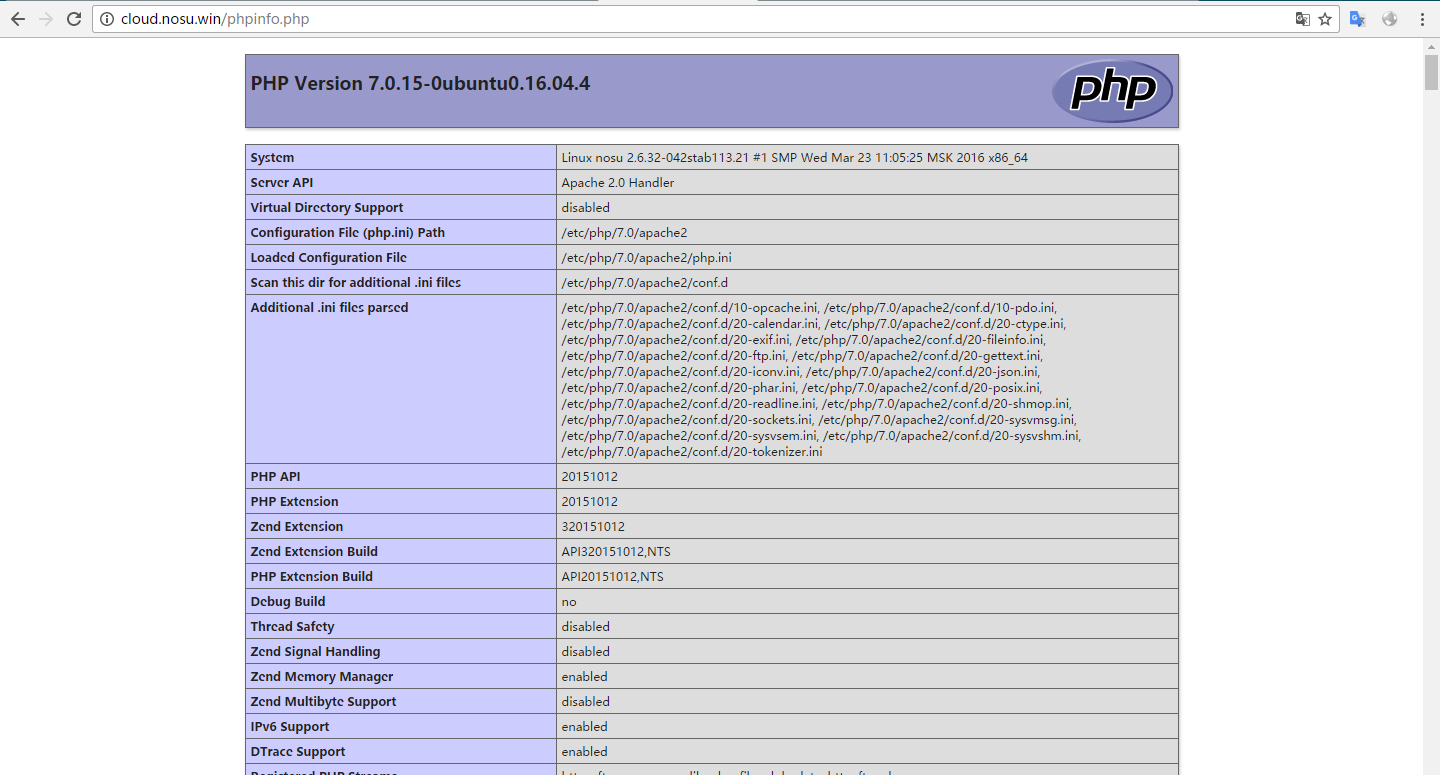
安装PHP7
root@nosu:apt-get install php7.0 libapache2-mod-php7.0 php7.0-mbstring -y
root@nosu:service apache2 restart
写一个phpinfo文件进行测试:
root@nosu:cd /var/www/html
root@nosu:vim phpinfo.php
输入以下内容:
<?php phpinfo() ?>

或者干脆一点,一步创建phpinfo文件:
root@nosu:echo "<?php phpinfo() ?>" > /var/www/html/phpinfo.php
访问http://your.domain/phpinfo:
编辑Apache配置文件
重新组织一下目录结构,以便后期配置和维护理想的目录结构为:
/cloudserver
|-- data         #存放文件
|-- log          #存放日志
`-- nextcloud    #存放主程序
root@nosu:/# cd /
root@nosu:/# mkdir /cloudserver
root@nosu:/# cd cloudserver/
root@nosu:/cloudserver# mkdir log nextcloud data
root@nosu:/cloudserver# tree
.
|-- data
|-- log
`-- nextcloud
然后需要配置一下Apache的配置文件。主文件位于/etc/apache2/sites-available/000-default.conf
root@nosu:vim /etc/apache2/sites-enabled/000-default.conf
有以下几个地方要修改:
第一行(修改主机名):
<VirtualHost *:80>
修改为:
<VirtualHost 你的域名:80>
第九行(修改主机名)
#ServerName www.example.com
修改为
ServerName 你的域名
第十一、十二行(网站根目录和管理员邮箱)
ServerAdmin webmaster@localhost   #这个不改也罢
DocumentRoot /var/www/html
修改为
ServerAdmin 你的邮箱地址
DocumentRoot /cloudserver/nextcloud
第二十、十一行(日志文件位置)
ErrorLog ${APACHE_LOG_DIR}/error.log
CustomLog ${APACHE_LOG_DIR}/access.log combined
修改为
ErrorLog /cloudserver/log/error.log
CustomLog /cloudserver/log/access.log combined
最后再修改一下apache2.conf,文件位于/etc/apache2/apache2.conf,不修改的话会403报错
第164~168行
<Directory /var/www>
        Options Indexes FollowSymLinks
        AllowOverride None
        Require all granted
</Directory>
修改为
<Directory /cloudserver>
        Options Indexes FollowSymLinks
        AllowOverride None
        Require all granted
</Directory>
下面展示一下我的两个配置文件,作为示例以供参考
000-default.conf:
<VirtualHost cloud.nosu.win:80>
	# The ServerName directive sets the request scheme, hostname and port that
	# the server uses to identify itself. This is used when creating
	# redirection URLs. In the context of virtual hosts, the ServerName
	# specifies what hostname must appear in the request's Host: header to
	# match this virtual host. For the default virtual host (this file) this
	# value is not decisive as it is used as a last resort host regardless.
	# However, you must set it for any further virtual host explicitly.
	#ServerName www.example.com

	ServerAdmin 666@orgleaf.com
	DocumentRoot /cloudserver/nextcloud

	# Available loglevels: trace8, ..., trace1, debug, info, notice, warn,
	# error, crit, alert, emerg.
	# It is also possible to configure the loglevel for particular
	# modules, e.g.
	#LogLevel info ssl:warn

	ErrorLog ${APACHE_LOG_DIR}/error.log
	CustomLog ${APACHE_LOG_DIR}/access.log combined

	# For most configuration files from conf-available/, which are
	# enabled or disabled at a global level, it is possible to
	# include a line for only one particular virtual host. For example the
	# following line enables the CGI configuration for this host only
	# after it has been globally disabled with "a2disconf".
	#Include conf-available/serve-cgi-bin.conf
</VirtualHost>

# vim: syntax=apache ts=4 sw=4 sts=4 sr noet
apache2.conf:
# This is the main Apache server configuration file.  It contains the
# configuration directives that give the server its instructions.
# See http://httpd.apache.org/docs/2.4/ for detailed information about
# the directives and /usr/share/doc/apache2/README.Debian about Debian specific
# hints.
#
#
# Summary of how the Apache 2 configuration works in Debian:
# The Apache 2 web server configuration in Debian is quite different to
# upstream's suggested way to configure the web server. This is because Debian's
# default Apache2 installation attempts to make adding and removing modules,
# virtual hosts, and extra configuration directives as flexible as possible, in
# order to make automating the changes and administering the server as easy as
# possible.

# It is split into several files forming the configuration hierarchy outlined
# below, all located in the /etc/apache2/ directory:
#
#	/etc/apache2/
#	|-- apache2.conf
#	|	`--  ports.conf
#	|-- mods-enabled
#	|	|-- *.load
#	|	`-- *.conf
#	|-- conf-enabled
#	|	`-- *.conf
# 	`-- sites-enabled
#	 	`-- *.conf
#
#
# * apache2.conf is the main configuration file (this file). It puts the pieces
#   together by including all remaining configuration files when starting up the
#   web server.
#
# * ports.conf is always included from the main configuration file. It is
#   supposed to determine listening ports for incoming connections which can be
#   customized anytime.
#
# * Configuration files in the mods-enabled/, conf-enabled/ and sites-enabled/
#   directories contain particular configuration snippets which manage modules,
#   global configuration fragments, or virtual host configurations,
#   respectively.
#
#   They are activated by symlinking available configuration files from their
#   respective *-available/ counterparts. These should be managed by using our
#   helpers a2enmod/a2dismod, a2ensite/a2dissite and a2enconf/a2disconf. See
#   their respective man pages for detailed information.
#
# * The binary is called apache2. Due to the use of environment variables, in
#   the default configuration, apache2 needs to be started/stopped with
#   /etc/init.d/apache2 or apache2ctl. Calling /usr/bin/apache2 directly will not
#   work with the default configuration.


# Global configuration
#

#
# ServerRoot: The top of the directory tree under which the server's
# configuration, error, and log files are kept.
#
# NOTE!  If you intend to place this on an NFS (or otherwise network)
# mounted filesystem then please read the Mutex documentation (available
# at <URL:http://httpd.apache.org/docs/2.4/mod/core.html#mutex>);
# you will save yourself a lot of trouble.
#
# Do NOT add a slash at the end of the directory path.
#
#ServerRoot "/etc/apache2"

#
# The accept serialization lock file MUST BE STORED ON A LOCAL DISK.
#
Mutex file:${APACHE_LOCK_DIR} default

#
# PidFile: The file in which the server should record its process
# identification number when it starts.
# This needs to be set in /etc/apache2/envvars
#
PidFile ${APACHE_PID_FILE}

#
# Timeout: The number of seconds before receives and sends time out.
#
Timeout 300

#
# KeepAlive: Whether or not to allow persistent connections (more than
# one request per connection). Set to "Off" to deactivate.
#
KeepAlive On

#
# MaxKeepAliveRequests: The maximum number of requests to allow
# during a persistent connection. Set to 0 to allow an unlimited amount.
# We recommend you leave this number high, for maximum performance.
#
MaxKeepAliveRequests 100

#
# KeepAliveTimeout: Number of seconds to wait for the next request from the
# same client on the same connection.
#
KeepAliveTimeout 5


# These need to be set in /etc/apache2/envvars
User ${APACHE_RUN_USER}
Group ${APACHE_RUN_GROUP}

#
# HostnameLookups: Log the names of clients or just their IP addresses
# e.g., www.apache.org (on) or 204.62.129.132 (off).
# The default is off because it'd be overall better for the net if people
# had to knowingly turn this feature on, since enabling it means that
# each client request will result in AT LEAST one lookup request to the
# nameserver.
#
HostnameLookups Off

# ErrorLog: The location of the error log file.
# If you do not specify an ErrorLog directive within a <VirtualHost>
# container, error messages relating to that virtual host will be
# logged here.  If you *do* define an error logfile for a <VirtualHost>
# container, that host's errors will be logged there and not here.
#
ErrorLog ${APACHE_LOG_DIR}/error.log

#
# LogLevel: Control the severity of messages logged to the error_log.
# Available values: trace8, ..., trace1, debug, info, notice, warn,
# error, crit, alert, emerg.
# It is also possible to configure the log level for particular modules, e.g.
# "LogLevel info ssl:warn"
#
LogLevel warn

# Include module configuration:
IncludeOptional mods-enabled/*.load
IncludeOptional mods-enabled/*.conf

# Include list of ports to listen on
Include ports.conf


# Sets the default security model of the Apache2 HTTPD server. It does
# not allow access to the root filesystem outside of /usr/share and /var/www.
# The former is used by web applications packaged in Debian,
# the latter may be used for local directories served by the web server. If
# your system is serving content from a sub-directory in /srv you must allow
# access here, or in any related virtual host.
<Directory />
	Options FollowSymLinks
	AllowOverride None
	Require all denied
</Directory>

<Directory /usr/share>
	AllowOverride None
	Require all granted
</Directory>

<Directory /cloudserver>
	Options Indexes FollowSymLinks
	AllowOverride None
	Require all granted
</Directory>

#<Directory /srv/>
#	Options Indexes FollowSymLinks
#	AllowOverride None
#	Require all granted
#</Directory>


# AccessFileName: The name of the file to look for in each directory
# for additional configuration directives.  See also the AllowOverride
# directive.
#
AccessFileName .htaccess

#
# The following lines prevent .htaccess and .htpasswd files from being
# viewed by Web clients.
#
<FilesMatch "^\.ht">
	Require all denied
</FilesMatch>


#
# The following directives define some format nicknames for use with
# a CustomLog directive.
#
# These deviate from the Common Log Format definitions in that they use %O
# (the actual bytes sent including headers) instead of %b (the size of the
# requested file), because the latter makes it impossible to detect partial
# requests.
#
# Note that the use of %{X-Forwarded-For}i instead of %h is not recommended.
# Use mod_remoteip instead.
#
LogFormat "%v:%p %h %l %u %t \"%r\" %>s %O \"%{Referer}i\" \"%{User-Agent}i\"" vhost_combined
LogFormat "%h %l %u %t \"%r\" %>s %O \"%{Referer}i\" \"%{User-Agent}i\"" combined
LogFormat "%h %l %u %t \"%r\" %>s %O" common
LogFormat "%{Referer}i -> %U" referer
LogFormat "%{User-agent}i" agent

# Include of directories ignores editors' and dpkg's backup files,
# see README.Debian for details.

# Include generic snippets of statements
IncludeOptional conf-enabled/*.conf

# Include the virtual host configurations:
IncludeOptional sites-enabled/*.conf

# vim: syntax=apache ts=4 sw=4 sts=4 sr noet
重启Apache:
root@nosu:/etc/apache2# service apache2 start
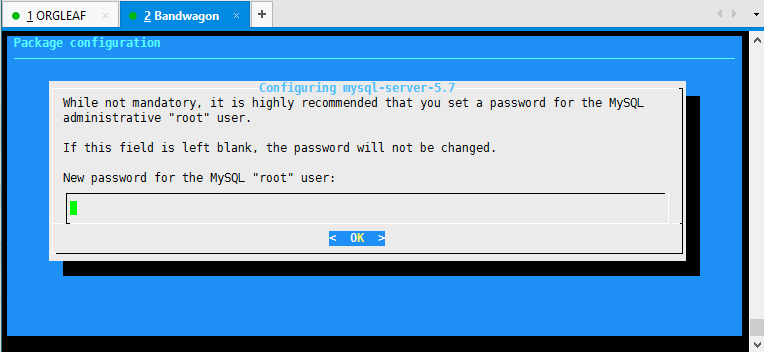
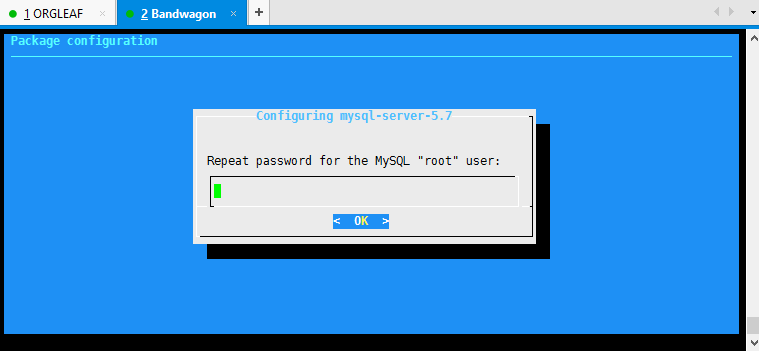
安装MySQL
root@nosu:~# apt-get install mysql-server
安装过程中按照提示设置密码
安装php-mysql扩展:
root@nosu:~# apt-get install php7.0-mysql
root@nosu:~# service apache2 restart
配置数据库
有两种配置数据库的方法,前者较省事,后者相对麻烦些但是比较直观易操作。方法1:使用SQL命令配置数据库
#登录mysql mysql -u root -p#创建名为nextcloud的数据库 mysql> CREATE DATABASE nextcloud; Query OK, 1 row affected (0.01 sec)
#切换数据库 mysql> USE nextcloud Database changed
#创建名为nextcloud的用户,密码为password,并赋予相关权限 mysql> GRANT All ON nextcloud.* TO nextcloud@localhost IDENTIFIED BY ‘password’; Query OK, 0 rows affected, 1 warning (0.00 sec)
#登出mysql mysql> exit Bye
方法2:使用phpMyAdmin配置数据库
下载phpMyAdminroot@nosu:~# cd /cloudserver/
root@nosu:/cloudserver# cd nextcloud/
root@nosu:/cloudserver/nextcloud# ls
root@nosu:/cloudserver/nextcloud# wget https://files.phpmyadmin.net/phpMyAdmin/4.7.0/phpMyAdmin-4.7.0-all-languages.zip
--2017-04-09 01:03:22-- https://files.phpmyadmin.net/phpMyAdmin/4.7.0/phpMyAdmin-4.7.0-all-languages.zip
Resolving files.phpmyadmin.net (files.phpmyadmin.net)... 185.180.13.17
Connecting to files.phpmyadmin.net (files.phpmyadmin.net)|185.180.13.17|:443... connected.
HTTP request sent, awaiting response... 200 OK
Length: 14150287 (13M) [application/zip]
Saving to: 'phpMyAdmin-4.7.0-all-languages.zip'
phpMyAdmin-4.7.0-all-langu 100%[=====================================>] 13.49M 48.8MB/s in 0.3s
2017-04-09 01:03:23 (48.8 MB/s) - ‘phpMyAdmin-4.7.0-all-languages.zip’ saved [14150287/14150287]
root@nosu:/cloudserver/nextcloud# unzip phpMyAdmin-4.7.0-all-languages.zip
root@nosu:/cloudserver/nextcloud# mv phpMyAdmin-4.7.0-all-languages admin
访问http://你的域名/admin,输入MySQL用户名(root)和之前设置的密码,点击“执行”登录。
创建一个用户以及同名数据库
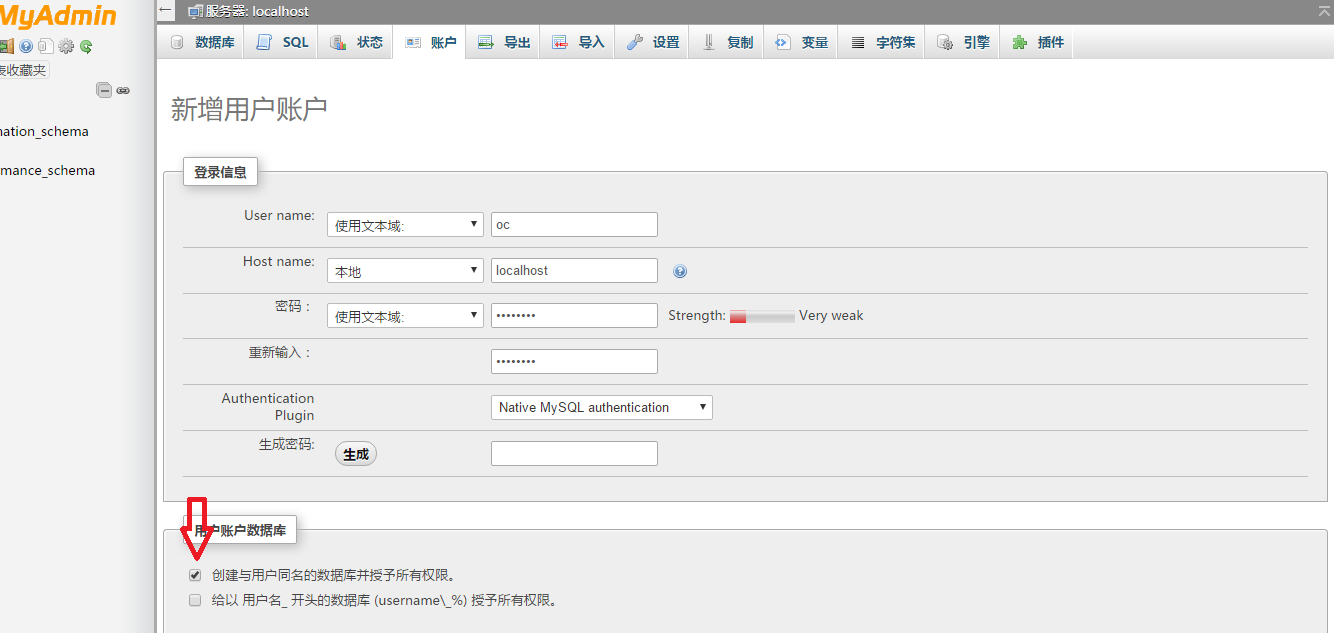
完成创建后,一定要将phpMyAdmin整个删除。
安装Nextcloud
清理安装目录:root@nosu:/cloudserver/nextcloud# rm * -Rf
下载、解压Nextcloud
root@nosu:/cloudserver/nextcloud# wget https://download.nextcloud.com/server/releases/nextcloud-11.0.2.zip
root@nosu:/cloudserver/nextcloud# unzip nextcloud-11.0.2.zip
删除源安装包、移动文件:
root@nosu:/cloudserver/nextcloud# ls
nextcloud  nextcloud-11.0.2.zip
root@nosu:/cloudserver/nextcloud# rm nextcloud-11.0.2.zip
root@nosu:/cloudserver/nextcloud# ls
nextcloud
root@nosu:/cloudserver/nextcloud# mv nextcloud/* ../nextcloud/
root@nosu:/cloudserver/nextcloud# rm nextcloud/ -Rf
访问http://你的域名/

[infobox]如果你使用的是Nextcloud12.0.0以上版本,可能会出现503错误(权限问题)。无须担心,继续下面的步骤即可[/infobox]
文件夹权限设置
复制以下内容#!/bin/bash
ocpath='/cloudserver/nextcloud'
htuser='www-data'
htgroup='www-data'
rootuser='root'
printf “Creating possible missing Directories\n”
mkdir -p $ocpath/data
mkdir -p $ocpath/assets
mkdir -p $ocpath/updater
printf “chmod Files and Directories\n”
find ${ocpath}/ -type f -print0 | xargs -0 chmod 0640
find ${ocpath}/ -type d -print0 | xargs -0 chmod 0750
printf “chown Directories\n”
chown -R ${rootuser}:${htgroup} ${ocpath}/
chown -R ${htuser}:${htgroup} ${ocpath}/apps/
chown -R ${htuser}:${htgroup} ${ocpath}/assets/
chown -R ${htuser}:${htgroup} ${ocpath}/config/
chown -R ${htuser}:${htgroup} ${ocpath}/data/
chown -R ${htuser}:${htgroup} ${ocpath}/themes/
chown -R ${htuser}:${htgroup} ${ocpath}/updater/
chmod +x ${ocpath}/occ
printf “chmod/chown .htaccess\n”
if [ -f ${ocpath}/.htaccess ]
then
chmod 0644 ${ocpath}/.htaccess
chown ${rootuser}:${htgroup} ${ocpath}/.htaccess
fi
if [ -f ${ocpath}/data/.htaccess ]
then
chmod 0644 ${ocpath}/data/.htaccess
chown ${rootuser}:${htgroup} ${ocpath}/data/.htaccess
fi
创建一个文件(位置随意)并把以上内容粘贴进去
root@nosu:/# vim set.sh
root@nosu:/# chmod +x set.sh #赋予可执行权限
执行:
root@nosu:/# ./set.sh
Creating possible missing Directories
chmod Files and Directories
chown Directories
chmod/chown .htaccess
另外还要对我自己添加data目录授予权限
root@nosu:/# chmod 770 /cloudserver/data/ -Rf
root@nosu:/# chown www-data /cloudserver/data/ -Rf
root@nosu:/# chown :www-data /cloudserver/data/ -Rf
安装缺失的php扩展
刷新网页后,提示有模块未安装。对未安装的php扩展予以安装root@nosu:/# apt-get install php7.0-zip php7.0-dom php7.0-xml php7.0-gd php7.0-curl php7.0-mysql root@nosu:/# service apache2 restart
输入信息后安装

这儿其实是最简单但也很有可能出错的地方,主要是两个地方:数据目录和数据库配置。数据目录要填写绝对目录,最后不带“/”,而且要保证这个目录至少拥有750权限、用户名和组为www-data。数据库这要填写之前使用phpMyAdmin所设置的用户名和数据库。
继续浏览:VPS快速完美部署ownCloud/Nextcloud全过程(2)
- https配置
- 隐藏url中的index.php
- memcached配置
